Dynamics 365 – Customer engagement
Before you start, you should know that I am not a developer. I can’t answer questions about development directly. This is intended for functional consultants that want to be able to make simple plugins without any developer knowledge.
Scenario:
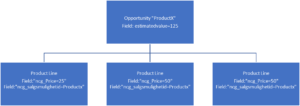
I have an opportunity with a custom product table connected. I need the value of the product lines to synchronously sum up to the Opportunity when I hit save. Pretty much the same you would expect when you use the out of the box product entity.
Prerequisites:
Create a new trial for Dynamics 365 (https://trials.dynamics.com/ ). There are several ways to do this, but the link should work fine. Then download the Community Edition of Visual Studio (free in most cases, but be sure to read the license requirements). https://www.visualstudio.com/thank-you-downloading-visual-studio/?sku=Community&rel=15 Under the installation just click next next etc. The first time you need to perform a choice is here:

Make sure you choose the .net desktop checkbox. Then continue to click next next and wait until you are done.
Next create a folder on c:/ I created one called D365Tools

Now open PowerShell and navigate to folder
Then open the URL: https://docs.microsoft.com/en-us/dynamics365/customer-engagement/developer/download-tools-nuget
Navigate to ths script part futher down the page, and copy the whole text. Use the Copy button in the top right corner

Paste the whole script to PowerShell (below is just a part of the code). Hit enter and let it finish.

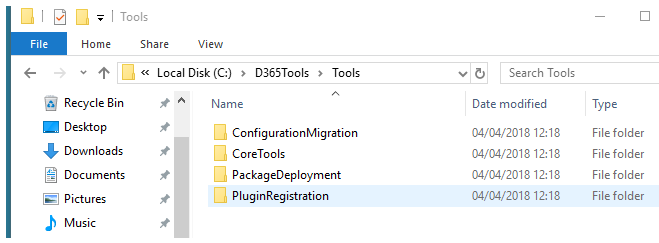
When it is done, your folder should look like this:
We will be using the PluginRegistration and CoreTools later. Just in case, we will download the SDK framework 4.6.2 developer pack:
https://www.microsoft.com/net/download/visual-studio-sdks

Just hit next next until done.
Visual Studio

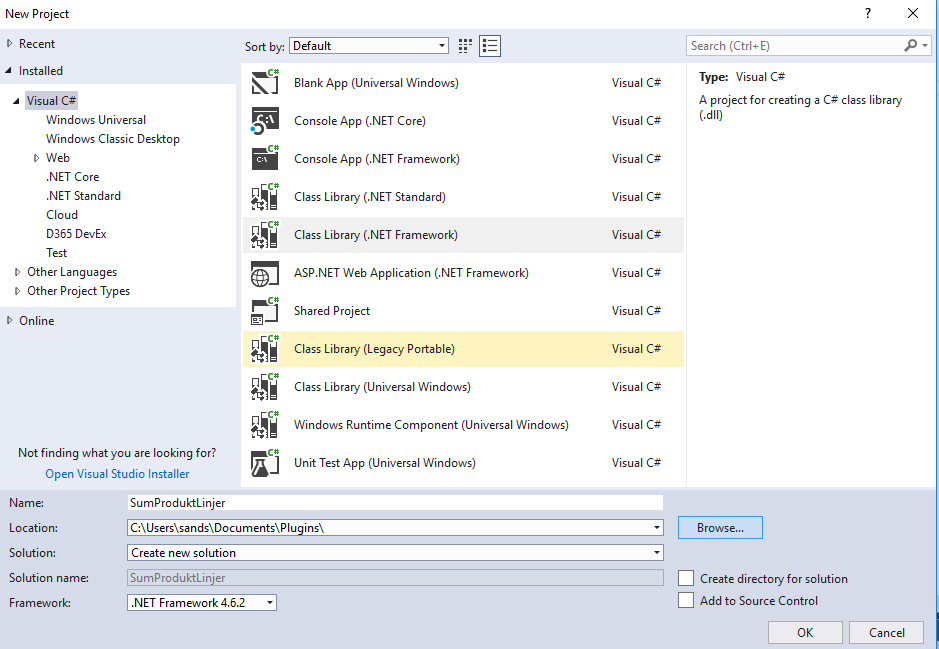
We are now ready to open visual studio and start a new project.
Make sure you choose Class Library (.Net Framework), and then choose the .net 4.6.2 in the bottom left. I have chosen a path in my documents for storing the code. Just choose any location you want.
Now copy paste the following code:
using System;
using System.Collections.Generic;
using Microsoft.Xrm.Sdk;
using CrmEarlyBound;
using System.Linq;
using Microsoft.Xrm.Sdk.Client;
namespace SumProduktLinjer
{
public class SumProduktlinjer : IPlugin
{
public void Execute(IServiceProvider serviceProvider)
{
IPluginExecutionContext context = (IPluginExecutionContext)
serviceProvider.GetService(typeof(IPluginExecutionContext));
IOrganizationServiceFactory factory =
(IOrganizationServiceFactory)serviceProvider.GetService(typeof(IOrganizationServiceFactory));
IOrganizationService service = factory.CreateOrganizationService(context.UserId);
OrganizationServiceContext orgContext = new OrganizationServiceContext(service);
//This will give us the chance to log information to CRM so we can see what happens in the plugin
ITracingService tracingService = (ITracingService)serviceProvider.GetService(typeof(ITracingService));
//This will check to see that a plugin has fired on an entity. This is where we end up on create and update.
if (context.InputParameters.Contains("Target") &&
context.InputParameters["Target"] is Entity)
{
//Getting the actual entity. DO NOT CHANGE THE Image name here if you follow the guide.
Entity ProductLinePostImage = (Entity)context.PostEntityImages["Image"];
//Then i just check if the entity has a field called "ncg_salgsmulighetid" relationship to oppty you don\'t need this
if (ProductLinePostImage.Attributes.ContainsKey("ncg_salgsmulighetid"))
{
//Creating reference to the oppty
EntityReference ParentOpptyRefPost = (EntityReference)ProductLinePostImage.Attributes["ncg_salgsmulighetid"];
//Calling the search for product lines while expecting a decimal (total value) as return.
Decimal TotalProductLines = ProductLinesFetch(ParentOpptyRefPost, orgContext, tracingService);
//the same way you use alerts in javascript, you can use tracing service below.
//tracingService.Trace(TotalProduktLines);
//or
//tracingService.Trace("Totalprislinjer fra Fetch: {0}", TotalProduktLinjer);
//Convert the desimal to a Money field
Money TotalproduktlinjerMoney = new Money(TotalProductLines);
//Create a new entity "object" in CRM. Use the GUID from the Post Image. And then use the total Money variable
//to update the estimated value of the opportunity you want to update.
Entity ParentOpptyUpdate = new Entity("opportunity");
ParentOpptyUpdate.Id = ParentOpptyRefPost.Id;
ParentOpptyUpdate.Attributes["estimatedvalue"] = TotalproduktlinjerMoney;
//When done defining what to update, we trigger the actual update to the parent
service.Update(ParentOpptyUpdate);
}
}else
{
//This code will run when you delete a product line. Same check here to see if field exists
Entity PreProduktLinjer = (Entity)context.PreEntityImages["Image"];
if (PreProduktLinjer.Attributes.ContainsKey("ncg_salgsmulighetid"))
{
//Creating a reference to the parent "opportunity"
EntityReference ParentOpptyRefPre = (EntityReference)PreProduktLinjer.Attributes["ncg_salgsmulighetid"];
//Calling the search for product lines while expecting a decimal (total value) as return.
Decimal TotalProduktLinjer = ProductLinesFetch(ParentOpptyRefPre, orgContext, tracingService);
//Converting the result from our search to the Money we need.
Money TotalproduktlinjerMoney = new Money(TotalProduktLinjer);
//Create a new entity "object" in CRM. Use the GUID from the Post Image. And then use the total Money variable
//to update the estimated value of the opportunity you want to update.
Entity ParentOpptyUpdate = new Entity("opportunity");
ParentOpptyUpdate.Id = ParentOpptyRefPre.Id;
ParentOpptyUpdate.Attributes["estimatedvalue"] = TotalproduktlinjerMoney;
//When done defining what to update, we trigger the actual update to the parent
service.Update(ParentOpptyUpdate);
}
}
}
//This is the search function.
public Decimal ProductLinesFetch(EntityReference OpportunityRef, OrganizationServiceContext orgContext, ITracingService trace)
{
Decimal SumProductLines = 0;
//A lot like the advanced find. We start out by saying we are searching for the product line eneity.
//Then we say that filter is where product line opporutunity GUID is the one we want to update against.
IQueryable ProductLineQuery = orgContext.CreateQuery();
List listOfProductLines = ProductLineQuery.Where(p => p.ncg_SalgsmulighetId.Id == OpportunityRef.Id).ToList();
//then we loop through and add all of the lines to the SumProductLines before we return it.
foreach (var productLine in listOfProductLines)
{
SumProductLines += productLine.ncg_Pris.Value;
}
return SumProductLines;
}
}
Next, we add a reference to the SDK. Navigate to the folder we created and ran the PowerShell Script
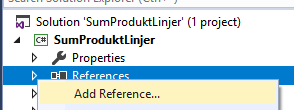
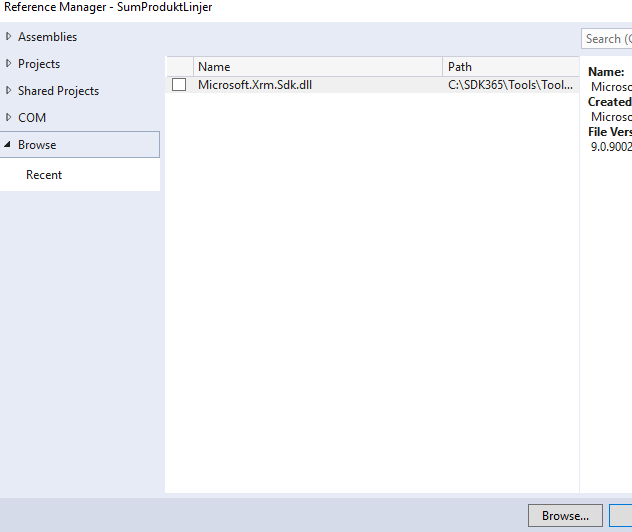
Open browse
Find your folder for CoreTools and then choose the Microsoft.Xrm.Sdk.dll
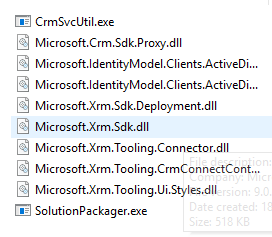
Click OK, and you should now see lots of the RED errors disappear.
Next thing we need to do is add something called ProxyClasses. I am not sure how to explain this, but it is a list of all fields and available options on each entity we are working with.
XRMToolbox
Download XRM toolbox if you don’t already have it.
https://www.xrmtoolbox.com/ Install the Early Bound Generator

Connect to the organization and open the Early Bound Generator. We only need 2 entities, so move all of the other ones over to the right.
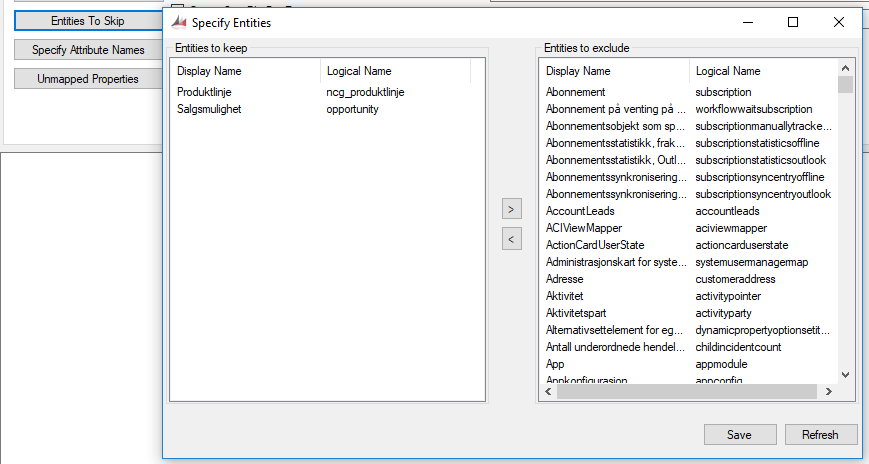
Click create entities

Then open the option set.
Click “Create OptionSets”
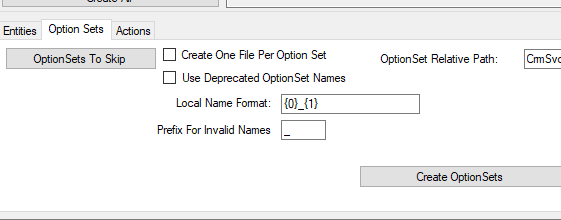
Open the file location by choosing the option set relative path browse button.

Copy these files into a folder you call ProxyClasses in your project.
Add the folder ProxyClasses to the project

There should not be any more red errors in your code. If you have followed this correctly, it should all be ok.

Editing the code
Now we must edit the code. What you need to replace is the names of fields and entities if you are not using the same names as me. Look for the “ncg_salgsmulighetid”. This is the lookup on my custom product table linking to the opportunity.
Then we need to fix the query.

Here you have to change the “ncg_produktlinje” to the entity you created as a child to oppty, and the “p.ncg_salgsmulighetId.Id”. It might be case sensitive here, so try and use the Schema name in the config.

Getting confused? Don’t worry, it makes perfect sense once you know what to look for? Just remember that I chose to use a new entity called “ncg_produktlinje”, and you will probably name it something else. The rest is just changing out the lookup value to opportunity from the child entity.
Now that the code has been done, there is one last thing we need to do before installing to Dynamics 365

Open properties in the project
Choose Signing


Choose sign the assembly and new. Write something and choose a password. Click OK when you are done.
Now we can build the solution (right click on project or hit F6)

In the bottom of the screen you should see something like this:

Registering the plugin
Open the tools you downloaded earlier in the guide

Create a new connection and connect to your CRM system. In the list of organizations. Choose the one you have created the entities for.


Browse

Now locate the plugin you created as .dll file. Open your project in file explorer, and you will find a bin/Debug folder. Here you should find the DLL. In my case it was “SumProduktLinjer.dll”.

Now hit register plugin. When done, click close. You can now refresh the view to see the plugin.
The next thing we need to do is register steps and images for Create/Update/Delete. The step is a definition of when it should fire, and the image is a definition of what the product line looks like before or after the actual save to the database. If you don’t understand what I mean, just copy what I do.
Create:


Register the step, and then we create an Image

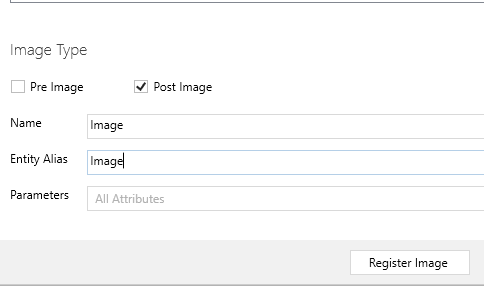
Make sure you choose Post Image, because on the create there is no Pre. The record doesn’t exist yet. If you wonder why I call it image here? It is because our code refers to this as image.

Now we have to do the same for Update and Delete.


IMPORTANT Delete command does not use post image. Only PRE image

The reason is that there is nothing there after the delete. Therefore, we have to see what the value was before the delete was done in the database.
The result should be something like this:

3 steps and 3 images.
The final result
Create new opportunity and hit save. Now add a new product from the new product subgrid

(this is quick create in Norwegian)

After you save, refresh the opportunity

In the upper right-hand corner (Estimated revenue) is now 100 nok? NB!! Remember that there is a setting for opportunity that is either system calculated, or user defined for Estimated Revenue. Make sure it is user defined.
If you get any other errors, you need to look at the attribute names in your code. Make sure they are 100% correct, and that they might be case sensitive in the query.
Congratulations. You have now created the first plugin.


